其实单是nginx+v2的话已经有人提供一键脚本了,但已经安装了quickbox再想使用一键脚本是不可能的,所以我们需要手动配置一下。
Step.1 安装v2ray
wget https://install.direct/go.sh && sudo sh go.sh
安装完成后,请记录端口和uuid两项内容,之后会用到。他们会以如下方式在安装完成后显示:
PORT:随机数字
UUID:随机字符串
Created symlink from /etc/systemd/system/multi-user.target.wants/v2ray.service to
/lib/systemd/system/v2ray.service.
V2Ray is installed.
安装/升级完成后,v2不会自动启动,如果跟本篇教程走也不需要启动,启动命令如下:
sudo systemctl start v2ray
Step.2 更改服务器端v2设置
使用vim编辑/etc/v2ray/config.json中的配置,直接将下面的配置复制进去就行了,注意下面需要替换成自己的端口和uuid还有路径。
{
  "inbounds": [
    {
      "port": 此处填入自己的端口,
      "listen":"127.0.0.1",//只监听 127.0.0.1,避免除本机外的机器探测到开放了安装时给的端口
      "protocol": "vmess",
      "settings": {
        "clients": [
          {
            "id": "此处填入自己的uuid",
            "alterId": 64
          }
        ]
      },
      "streamSettings": {
        "network": "ws",
        "wsSettings": {
        "path": "/ray"
        }
      }
    }
  ],
  "outbounds": [
    {
      "protocol": "freedom",
      "settings": {}
    }
  ]
}
建议在配置完成后使用/usr/bin/v2ray/v2ray -test -config /etc/v2ray/config.json来确定配置是否正确。如果出现Configuration OK.的字样就代表配置无误,否则请检查是否缺少空格之类的问题。
Step.3nginx配置
使用vim打开
/etc/nginx/sites-enabled/default在其中任意一location下添加如下内容,注意两处内容替换:location 这边填刚才设置的v2路径,加上/,如/v2ray {
if ($http_upgrade != "websocket") {
return 404;
}
proxy_redirect off;
proxy_pass http://127.0.0.1:这边需要改成之前的端口;
proxy_http_version 1.1;
proxy_set_header Upgrade $http_upgrade;
proxy_set_header Connection "upgrade";
proxy_set_header Host $host;
# Show real IP in v2ray access.log
proxy_set_header X-Real-IP $remote_addr;
proxy_set_header X-Forwarded-For $proxy_add_x_forwarded_for;
}
之后,使用命令nginx -t确认自己加入的配置有无语法错误,如果可以进行下一步,分别使用命令/etc/init.d/nginx restart重启nginx和sudo systemctl start v2ray启动v2。
Step.4 客户端配置
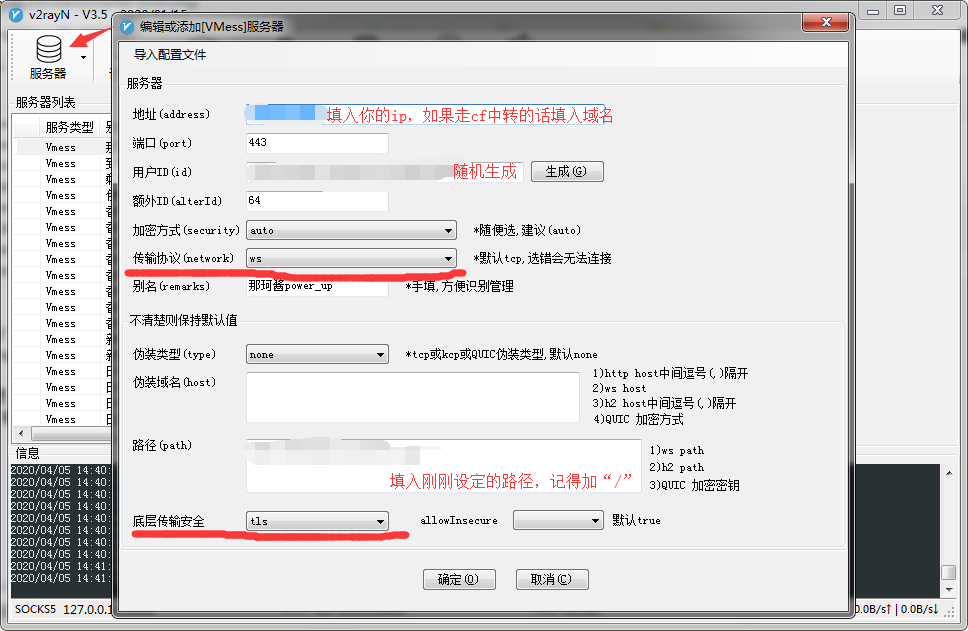
以v2rayN为例,看图填入相关配置即可。
Step.5 cf中转v2流量
只需要在cf中绑定域名,然后再在SSL-TLS页面中选择策略为完全即可。
如果有两个域名,一个走cf,另外一个不走cf,可以在/etc/nginx/sites-enabled/default添加以下内容:
server {
    listen 444 ssl http2 default_server;
    listen [::]:444 ssl http2 default_server;
    server_name 第二个域名;
    ssl_certificate /etc/nginx/ssl/dw.iamydp.cn/1_dw.tanamoe.top_bundle.crt;#下面两行涉及到ssl证书配置,参见[https://www.iamydp.cn/archives/54.html][4]SSL证书部分
    ssl_certificate_key /etc/nginx/ssl/dw.iamydp.cn/2_dw.tanamoe.top.key;
    include snippets/ssl-params.conf;
    client_max_body_size 40M;
    server_tokens off;
    root /srv/;

    index index.html index.php index.htm;

    location /v2路径 {                           #此处都需要与第三步添加的配置完全一样
      if ($http_upgrade != "websocket") {
          return 404;
      }
      proxy_redirect off;
      proxy_pass http://127.0.0.1:v2端口;
      proxy_http_version 1.1;
      proxy_set_header Upgrade $http_upgrade;
      proxy_set_header Connection "upgrade";
      proxy_set_header Host $host;
      # Show real IP in v2ray access.log
      proxy_set_header X-Real-IP $remote_addr;
      proxy_set_header X-Forwarded-For $proxy_add_x_forwarded_for;
    }
}
附录部分:
- v2白话文教程:https://toutyrater.github.io/
- v2官方手册:https://v2ray.com/
- wordpress+v2+websocket一键脚本(仅支持centos,且无法验证安全性不建议使用):
yum install -y wget && wget https://raw.githubusercontent.com/V2RaySSR/V2RaySSR/master/v2ray_ws_tls_wp.sh && chmod +x v2ray_ws_tls_wp.sh && ./v2ray_ws_tls_wp.sh - vim使用教程:https://www.runoob.com/linux/linux-vim.html

全国兼职一线天论坛a0cz.cn
花三千睡一个女人值得吗a0gz.cn
离我最近的站街小组a0gy.cn
华纳圣淘沙开户步骤详解(183-8890-9465—?薇-STS5099【6011643】
华纳圣淘沙公司开户流程全解析(183-8890-9465—?薇-STS5099【6011643】
华纳圣淘沙公司账户注册指南(183-8890-9465—?薇-STS5099【6011643】
新手如何开通华纳圣淘沙公司账户(183-8890-9465—?薇-STS5099【6011643】
华纳圣淘沙企业开户标准流程(183-8890-9465—?薇-STS5099【6011643】
华纳圣淘沙公司开户:从零到一(183-8890-9465—?薇-STS5099【6011643】
官方指南:华纳圣淘沙公司开户流程(183-8890-9465—?薇-STS5099【6011643】
华纳圣淘沙公司开户流程说明书(183-8890-9465—?薇-STS5099【6011643】
新盛开户前客服电话咨询材料清单【1558--7291-507薇同1】
新盛开户官方客服电话 【1558--7291-507 薇同1】
新盛开户业务办理电话 【1558--7291-507 薇同1】
新盛开户联系电话大全 【1558--7291-507 薇同1】
李碧华鬼魅系列奇幻夜粤配
非典十年祭
测谎人
帕洛玛之旅
世界将不同
马1956
忠犬八公
神出鬼没ghosted
迷失在混乱之中
武林足球
狄亚伯洛大决斗
破碎的愤怒
鸳鸯楼惊魂
不良影响小网红大黑幕
新假面骑士
夺魂异阵图
荣耀之谁与争锋
我们的追星之路
奖励旅程
耶里肖
第一类型危险
记忆裂痕粤配
python教程
五郎八卦棍粤配
惊天追踪
走出非洲
警惕陷入二元对立思维,可尝试中间路径。
哈哈哈,写的太好了https://www.lawjida.com/
哈哈哈,写的太好了https://www.lawjida.com/
你的文章让我感受到了艺术的魅力,谢谢! http://www.55baobei.com/R1wDH90UiV.html
你的文章内容非常用心,让人感动。 http://www.55baobei.com/DSHXIBXYQg.html
不错不错,我喜欢看 www.jiwenlaw.com
想想你的文章写的特别好https://www.237fa.com/
本来也想自己做V2ray的服务器,后来发现还是太麻烦了,而且成本有点高。
结果发一个好的代理,很便宜而且速度还快,完爆各种代理。决定不自己弄了,分享给大家试试吧。他在国内还用了很多中转代理,下载能5m/s
URL:https://pud.life/aff/hrNs
悄悄告诉对你这个aff已经被换成我的了,评论我不会删,就当宣传下,而且其实我也觉得自己搞风险太高了233。